|
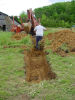
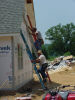
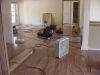
MVC-057F
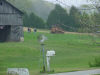
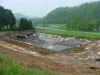
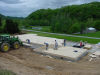
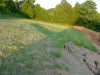
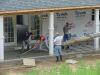
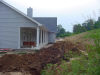
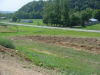
I'm laying out the house location for the bulldozer driver to start dozing.
Photographed by: Dave
Photograph taken on: 4/8/2003
|

|
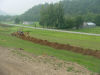
MVC-077F
The driveway is roughed in place.
Photographed by: Dave
Photograph taken on: 4/17/2003
|
|
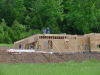
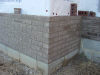
MVC-078F
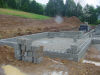
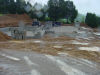
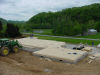
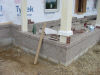
The foundation has been poured and cement blocks are almost completed.
Photographed by: Dave
Photograph taken on: 4/17/2003
|
|
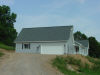
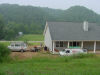
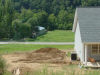
MVC-079F
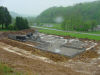
The location of the garage is on the front side of the house.
Photographed by: Dave
Photograph taken on: 4/17/2003
|
|
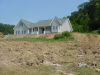
MVC-080F
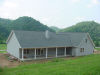
A higher view from behind the house.
Photographed by: Dave
Photograph taken on: 4/17/2003
|

|
MVC-081F
The view from the south end of the house.
Photographed by: Dave
Photograph taken on: 4/17/2003
|

|
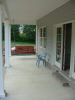
MVC-082F
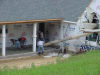
The back porch is closest to the camera.
Photographed by: Dave
Photograph taken on: 4/17/2003
|
|
MVC-083F
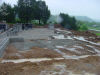
The rain stopped work for a couple of days.
Photographed by: Dave
Photograph taken on: 4/17/2003
|
|
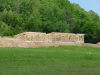
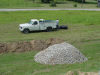
MVC-084F
The gravel makes the walking a little easier, now if it will ever dry out.
Photographed by: Dave
Photograph taken on: 4/17/2003
|

|
MVC-085
I enlisted some help to cut down a tree so the power company would string the lines.
Photographed by: Dave
Photograph taken on: 4/19/2003
|

|
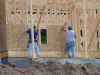
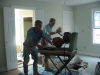
MVC-086F
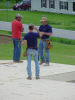
L to R - Ray, Sabra, Pauline, Brent, Linda and Jim are working while I'm taking a picture.
Photographed by: Dave
Photograph taken on: 4/19/2003
|

|
MVC-087F
Right about now is when Pauline's jacket was ate up by the mulcher.
Photographed by: Dave
Photograph taken on: 4/19/2003
|
|
MVC-091F
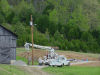
After the tree was down, Tri-County Electric set the pole.
Photographed by: Dave
Photograph taken on: 4/22/2003
|
|
MVC-092F
They are almost ready to hook up the temporary power.
Photographed by: Dave
Photograph taken on: 4/22/2003
|
|
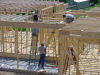
MVC-091F
The crew used air nailers on the floor decking.
Photographed by: Dave
Photograph taken on: 4/25/2003
|
|
MVC-093F
It made fast work of getting the floor nailed on the joists.
Photographed by: Dave
Photograph taken on: 4/25/2003
|
|
MVC-092F
Tony (in the straw hat) is laying out the lines for the walls.
Photographed by: Dave
Photograph taken on: 4/25/2003
|

|
MVC-094F
They are snapping a line for the end wall.
Photographed by: Dave
Photograph taken on: 4/25/2003
|

|
MVC-095F
They're snapping lines for the bedrooms and hallway.
Photographed by: Dave
Photograph taken on: 4/25/2003
|

|
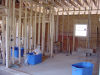
MVC-108F
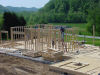
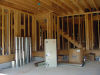
The first walls are up and more are ready to go up.
Photographed by: Dave
Photograph taken on: 4/28/2003
|
|
MVC-109F
The kitchen walls were built out of straight lumber they picked out of the delivery.
Photographed by: Dave
Photograph taken on: 4/28/2003
|

|
MVC-111F
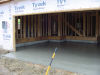
The crew is working on the front walls after window and door headers have been added.
Photographed by: Dave
Photograph taken on: 4/28/2003
|

|
MVC-112F
The walls are done and ceiling joists are being added to the porch.
Photographed by: Dave
Photograph taken on: 5/1/2003
|

|
MVC-113F
The stack of orange lumber is the OSB for the exterior walls.
Photographed by: Dave
Photograph taken on: 5/1/2003
|
|
MVC-115F
They're adding more framing above the pantry.
Photographed by: Dave
Photograph taken on: 5/1/2003
|
|
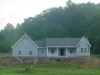
MVC-116F
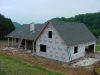
A view of the framing from the road.
Photographed by: Dave
Photograph taken on: 5/1/2003
|
|
MVC-122F
Tony and Guy are laying flooring in the bonus room, while the crew is working on siding with OSB.
Photographed by: Dave
Photograph taken on: 5/6/2003
|

|
MVC-123F
Guy helping Tony lock in a piece of floor decking.
Photographed by: Dave
Photograph taken on: 5/6/2003
|
|
MVC-125F
The crew nailing up OSB for the exterior walls.
Photographed by: Dave
Photograph taken on: 5/6/2003
|
|
MVC-130F
Cumberland County Water digging to find the main water line.
Photographed by: Dave
Photograph taken on: 5/6/2003
|

|
MVC-131F
They found it, made the connection and then knocked it loose.
Photographed by: Dave
Photograph taken on: 5/6/2003
|
|
MVC-132F
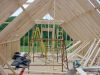
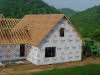
Most of the roof joists have been cut and nailed in place.
Photographed by: Dave
Photograph taken on: 5/12/2003
|
|
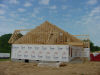
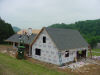
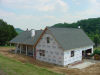
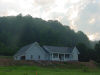
MVC-133F
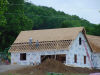
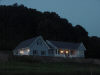
Now we are realizing how the house is going to set on the location.
Photographed by: Dave
Photograph taken on: 5/12/2003
|

|
MVC-134F
Bracing is in, and scaffolds have been set for upstairs work.
Photographed by: Dave
Photograph taken on: 5/12/2003
|
|
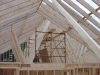
MVC-135F
Another set of scaffolds were used for work on bracing the roof joists.
Photographed by: Dave
Photograph taken on: 5/14/2003
|
|
MVC-136F
The side walls are in and collar ties are being placed for the bonus room ceiling.
Photographed by: Dave
Photograph taken on: 5/14/2003
|

|
MVC-138F
The bracing of the roof joists is almost completed.
Photographed by: Dave
Photograph taken on: 5/14/2003
|
|
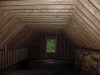
MVC-137F (Altered, Rotation)
The window in the front of the bonus room has been framed.
Photographed by: Dave
Photograph taken on: 5/14/2003
|
|
MVC-140F
Temporary braces for the back porch roof are in place.
Photographed by: Dave
Photograph taken on: 5/14/2003
|
|
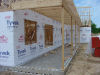
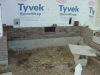
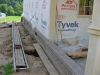
MVC-141F
Tyvek has been added to wrap the house and the gable has been framed.
Photographed by: Dave
Photograph taken on: 5/14/2003
|

|
MVC-143F
The house is almost ready for the roof decking to begin.
Photographed by: Dave
Photograph taken on: 5/14/2003
|

|
MVC-144F
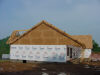
All the OSB for the exterior walls has been added and one row of roof decking is on the bonus room.
Photographed by: Dave
Photograph taken on: 5/17/2003
|

|
MVC-145F
Wall sheating and Tyvek has been added to the gable end walls.
Photographed by: Dave
Photograph taken on: 5/17/2003
|
|
MVC-146F
The bonus room has the roof decking on so the main rafters can be tied in to the roof of the bonus room.
Photographed by: Dave
Photograph taken on: 5/17/2003
|
|
MVC-147F
The gable end has been covered with OSB.
Photographed by: Dave
Photograph taken on: 5/17/2003
|

|
MVC-148F
The roof decking is on the bonus room and a prow has been added.
Photographed by: Dave
Photograph taken on: 5/17/2003
|

|
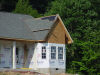
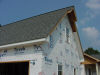
MVC-149F
The front bedroom has the gable completed.
Photographed by: Dave
Photograph taken on: 5/17/2003
|
|
MVC-165F
More roof decking is being added.
Photographed by: Dave
Photograph taken on: 5/19/2003
|

|
MVC-167F
The crew is using a nail gun for the roof decking and a crow bar to remove the boards they used for standing on. They only used a nail gun for the floor and roof decking.
Photographed by: Dave
Photograph taken on: 5/19/2003
|
|
MVC-170F
It's getting close to time for a roof.
Photographed by: Dave
Photograph taken on: 5/19/2003
|

|
MVC-172F
This is one of the shingles we picked for the roof.
Photographed by: Dave
Photograph taken on: 5/19/2003
|
|
MVC-174F
Here are the color choices for the siding, we chose the GRAY color on the bottom.
Photographed by: Dave
Photograph taken on: 5/19/2003
|

|
MVC-177F
The roof decking is done, waiting on the roofing crew to begin.
Photographed by: Dave
Photograph taken on: 5/20/2003
|

|
MVC-178F
The last of the walls were put between the roof above the half bath and the roof above the dinning area.
Photographed by: Dave
Photograph taken on: 5/20/2003
|
|
MVC-181F
The crew is using the tractor and tossing trash out of the window into the scoop.
Photographed by: Dave
Photograph taken on: 5/21/2003
|
|
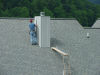
MVC-182F
The chimney for our stove has been added and facia boards.
Photographed by: Dave
Photograph taken on: 5/21/2003
|

|
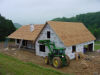
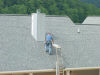
MVC-183F
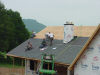
The roofers have arrived and started on the garage. This was taken after about 2 hours of work.
Photographed by: Dave
Photograph taken on: 5/22/2003
|

|
MVC-184F
The last square goes on the garage roof.
Photographed by: Dave
Photograph taken on: 5/22/2003
|
|
MVC-185F
They used the tractor to lift the shingles to the roof.
Photographed by: Dave
Photograph taken on: 5/22/2003
|
|
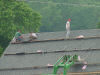
MVC-188F
A couple of two man crews and the shingle carrier put on the entire roof.
Photographed by: Dave
Photograph taken on: 5/22/2003
|
|
MVC-189F
It's almost lunch time when I took this picture.
Photographed by: Dave
Photograph taken on: 5/22/2003
|
|
MVC-191F
After lunch more shingling.
Photographed by: Dave
Photograph taken on: 5/22/2003
|
|
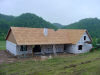
MVC-192F
The end of one day's work had the house over half done.
Photographed by: Dave
Photograph taken on: 5/22/2003
|

|
MVC-193F (Altered, Rotation)
The fiberglass columns have been set for the back porch.
Photographed by: Dave
Photograph taken on: 5/22/2003
|

|
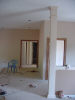
MVC-194F
There is also a fiberglass column in the entrance area inside.
Photographed by: Dave
Photograph taken on: 5/22/2003
|
|
MVC-197F
Looking from one end of the bonus room towards the highway.
Photographed by: Dave
Photograph taken on: 5/22/2003
|
|
MVC-198F
The roof cap is being put on the bonus room and the rest of the roofers are working on the front side.
Photographed by: Dave
Photograph taken on: 5/23/2003
|
|
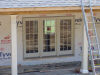
MVC-199F
The Anderson back doors for the living room are installed.
Photographed by: Dave
Photograph taken on: 5/23/2003
|

|
MVC-200F
The roofers are almost done, 53 squares in less than 2 days.
Photographed by: Dave
Photograph taken on: 5/23/2003
|

|
MVC-202F
They ran out of shingles with just a little left to do.
Photographed by: Dave
Photograph taken on: 5/23/2003
|
|
MVC-203F
Probably one more bundle would have finished the job.
Photographed by: Dave
Photograph taken on: 5/23/2003
|

|
MVC-204F
The front door has been installed.
Photographed by: Dave
Photograph taken on: 6/1/2003
|

|
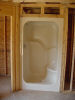
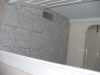
MVC-205F (Altered, Rotation)
The bath tub and shower enclosure has been set in place.
Photographed by: Dave
Photograph taken on: 6/1/2003
|

|
MVC-206F (Altered, Rotation)
The entry way to our house from the inside.
Photographed by: Dave
Photograph taken on: 6/1/2003
|

|
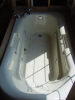
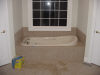
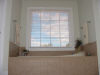
MVC-207F (Altered, Rotation)
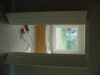
The whirlpool tub is set in it's location and the Anderson window is in place also.
Photographed by: Dave
Photograph taken on: 6/1/2003
|
|
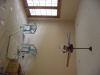
MVC-208F (Altered, Rotation)
The shower is in the master bath.
Photographed by: Dave
Photograph taken on: 6/1/2003
|
|
MVC-209F
The floor is clean after Linda, Stacey and I picked up the scrap pieces. I saved them for kindling for our stove.
Photographed by: Dave
Photograph taken on: 6/1/2003
|

|
MVC-210F (Altered, Rotation)
Looking at the leaded glass in our front door from inside.
Photographed by: Dave
Photograph taken on: 6/1/2003
|
|
MVC-211F
I'm looking forward to filling the tub and turning on the whirlpool.
Photographed by: Dave
Photograph taken on: 6/1/2003
|

|
MVC-212F
The electric meter box has been mounted.
Photographed by: Dave
Photograph taken on: 6/2/2003
|

|
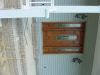
MVC-215F
The circuit breaker box inside the garage is also in place.
Photographed by: Dave
Photograph taken on: 6/2/2003
|
|
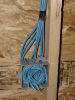
MVC-216F (Altered, Rotation)
CAT5 cable has been run by Brent and I for the computer networking.
Photographed by: Dave
Photograph taken on: 6/2/2003
|
|
MVC-218F (Altered, Rotation)
The PC center is located in the study. We also ran over 200 feet of coaxial cable for TV.
Photographed by: Dave
Photograph taken on: 6/2/2003
|
|
MVC-219F
The roof is completed, junk picked up and ready for cement and brick work.
Photographed by: Dave
Photograph taken on: 6/2/2003
|

|
MVC-221F
The bricks around the foundation blocks are being laid.
Photographed by: Dave
Photograph taken on: 6/9/2003
|
|
MVC-222F
More brick work under the half bath window has been done.
Photographed by: Dave
Photograph taken on: 6/9/2003
|
|
MVC-223F
Jerry's brick work corners are nice.
Photographed by: Dave
Photograph taken on: 6/9/2003
|
|
MVC-224F
Landslide!
Photographed by: Dave
Photograph taken on: 6/9/2003
|
|
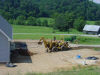
MVC-226F
The concrete has been poured in the garage for the floor.
Photographed by: Dave
Photograph taken on: 6/13/2003
|

|
MVC-229F
They have bull floated the concrete and will wait for it to harden a little before trowling it smooth.
Photographed by: Dave
Photograph taken on: 6/13/2003
|
|
MVC-230F
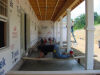
Brick work around the front porch showing the columns too.
Photographed by: Dave
Photograph taken on: 6/13/2003
|
|
MVC-240F
Part of the HVAC unit is sitting on the garage floor.
Photographed by: Dave
Photograph taken on: 6/22/2003
|

|
MVC-241F
The electrical panel is being wired while the heating contractor has installed metal ductwork.
Photographed by: Dave
Photograph taken on: 6/22/2003
|
|
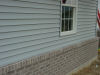
MVC-242F
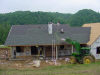
The brick work will go completely around the house.
Photographed by: Dave
Photograph taken on: 6/22/2003
|

|
MVC-244F
I talked to Guy and they put the bricks across the back porch too.
Photographed by: Dave
Photograph taken on: 6/25/2003
|
|
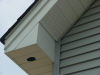
MVC-243F
Once the brick work was done, the same crew did the aluminum and vinyl for the over hang.
Photographed by: Dave
Photograph taken on: 6/25/2003
|

|
MVC-246F
Boxing in the overhang with metal.
Photographed by: Dave
Photograph taken on: 6/25/2003
|
|
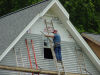
MVC-247F
The vinyl siding is going up while they are boxing in the overhang. They only have to put the scaffolds up one time when they do it at the same time.
Photographed by: Dave
Photograph taken on: 6/26/2003
|
|
MVC-248F
The front garage wall is completed
Photographed by: Dave
Photograph taken on: 6/26/2003
|
|
MVC-250F
They left a hole for our outside spotlights.
Photographed by: Dave
Photograph taken on: 6/26/2003
|
|
MVC-252F
Finishing the top of the front garage / bonus room wall.
Photographed by: Dave
Photograph taken on: 6/27/2003
|
|
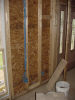
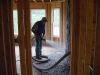
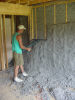
MVC-253F
They're spraying in the insulation. It fills all the cracks and voids that way.
Photographed by: Dave
Photograph taken on: 6/27/2003
|
|
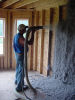
MVC-254F (rotated)
They spray it on really thick and let it build up.
Photographed by: Dave
Photograph taken on: 6/27/2003
|
|
MVC-257F (Rotation)
The second guy uses a power rubber roller to scrape off the extra right down to the 2 by 4s. The extra is picked up and run through again.
Photographed by: Dave
Photograph taken on: 6/27/2003
|

|
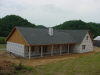
MVC-266F
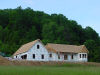
The front side of the house is starting to look finished.
Photographed by: Dave
Photograph taken on: 7/6/2003
|
|
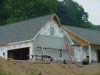
MVC-268F
The siding is only done on the front side.
Photographed by: Dave
Photograph taken on: 7/6/2003
|

|
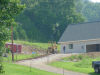
MVC-269F
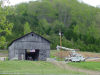
A picture from the hay field across the creek.
Photographed by: Dave
Photograph taken on: 7/6/2003
|

|
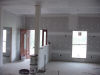
MVC-272F
The drywall crew started work in the garage.
Photographed by: Dave
Photograph taken on: 7/7/2003
|

|
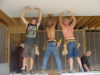
MVC-273F
They put up 12 foot long boards.
Photographed by: Dave
Photograph taken on: 7/7/2003
|
|
MVC-275F
The 4 guys put up 230 sheets in about 1-1/2 days.
Photographed by: Dave
Photograph taken on: 7/7/2003
|
|
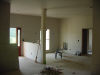
MVC-277F
After we picked up the mess it was looking more like the inside of a house.
Photographed by: Dave
Photograph taken on: 7/7/2003
|

|
MVC-278F
Now we can tell how big our rooms are going to be.
Photographed by: Dave
Photograph taken on: 7/7/2003
|
|
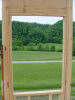
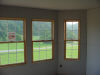
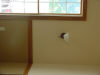
MVC-279F
Looking out of 3 of the 4 windows in the front bedroom.
Photographed by: Dave
Photograph taken on: 7/7/2003
|
|
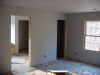
MVC-280F
The master bedroom looking towards the bath.
Photographed by: Dave
Photograph taken on: 7/7/2003
|

|
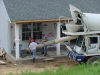
MVC-282F
The cement truck is pouring the concrete out of a chute for the back porch.
Photographed by: Dave
Photograph taken on: 7/9/2003
|
|
MVC-283F
You can still see the steel rebar they have laid for the floor of the porch.
Photographed by: Dave
Photograph taken on: 7/9/2003
|
|
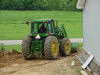
MVC-284F
Guy is grading the side yard and covering up some drywall pieces.
Photographed by: Dave
Photograph taken on: 7/9/2003
|
|
MVC-285F
They're raking the back porch concrete while the other guys are directing the pour.
Photographed by: Dave
Photograph taken on: 7/9/2003
|
|
MVC-286F
I never expected them to get the truck that close to the house, but that's almost the last of the concrete coming out now.
Photographed by: Dave
Photograph taken on: 7/9/2003
|

|
MVC-287F
Two of the crew are floating the concrete with a smaller float.
Photographed by: Dave
Photograph taken on: 7/9/2003
|
|
MVC-289F
They're trowling it smooth, then they will broom it to give it a little roughness for traction.
Photographed by: Dave
Photograph taken on: 7/9/2003
|
|
MVC-292F
They're striking lines across the concrete.
Photographed by: Dave
Photograph taken on: 7/9/2003
|
|
MVC-293F
Jerry and his helper are siding the back side of the bonus room.
Photographed by: Dave
Photograph taken on: 7/18/2003
|
|
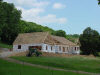
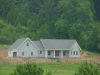
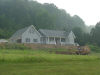
MVC-310F
A picture from the road.
Photographed by: Dave
Photograph taken on: 7/17/2003
|
|
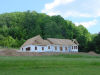
MVC-311F
A straight on shot.
Photographed by: Dave
Photograph taken on: 7/17/2003
|

|
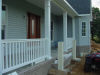
MVC-312F (Altered, Rotation)
Part of the front porch railing has been installed.
Photographed by: Dave
Photograph taken on: 7/18/2003
|
|
MVC-313F
The fiberglass columns have been set for the step railings.
Photographed by: Dave
Photograph taken on: 7/17/2003
|
|
MVC-315F (Altered, Rotation)
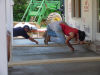
The back porch concrete is hard and I have installed our porch swing.
Photographed by: Dave
Photograph taken on: 7/18/2003
|

|
MVC-316F
The drywall has been taped and mudded, the screws have been covered too.
Photographed by: Dave
Photograph taken on: 7/17/2003
|
|
MVC-317F
Showing the dinning and entry way after mudding.
Photographed by: Dave
Photograph taken on: 7/17/2003
|

|
MVC-318F
The guys are painting on the texture on the ceiling in the bonus room.
Photographed by: Dave
Photograph taken on: 7/18/2003
|

|
MVC-319F
First they put on a heavy coat of plaster.
Photographed by: Dave
Photograph taken on: 7/18/2003
|

|
MVC-320F
Then they go over that coat with a roller that has reliefs cut in it and that makes the raised places and the texture on the ceilings.
Photographed by: Dave
Photograph taken on: 7/18/2003
|
|
MVC-323F
Jerry is cutting the last piece of vinyl for the chimney.
Photographed by: Dave
Photograph taken on: 7/23/2003
|
|
MVC-325F
Jerry is installing the last piece of vinyl for the chimney.
Photographed by: Dave
Photograph taken on: 7/23/2003
|

|
MVC-332F
The guys are forming and cutting aluminum seamless guttering and downspouts.
Photographed by: Dave
Photograph taken on: 7/30/2003
|

|
MVC-334F
They're now installing the downspout.
Photographed by: Dave
Photograph taken on: 7/30/2003
|

|
MVC-336F
The outside is almost done, but we do need a garage door.
Photographed by: Dave
Photograph taken on: 7/30/2003
|
|
MVC-337F
The stainless steel chimney cap is on.
Photographed by: Dave
Photograph taken on: 7/30/2003
|
|
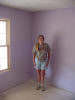
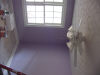
MVC-340F
Stacey and the Purple color she picked for her bedroom.
Photographed by: Dave
Photograph taken on: 7/30/2003
|
|
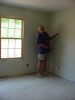
MVC-343F
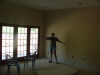
I'm pointing to the green color Linda picked for our bedroom.
Photographed by: Dave
Photograph taken on: 7/30/2003
|
|
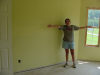
MVC-344F
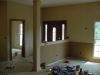
The front bedroom is a bright yellow.
Photographed by: Dave
Photograph taken on: 7/30/2003
|
|
MVC-345F
Tan is the best description for the living room color.
Photographed by: Dave
Photograph taken on: 7/30/2003
|

|
MVC-346F
Stained trim is going up in the living room area.
Photographed by: Dave
Photograph taken on: 8/5/2003
|

|
MVC-348F
The doors have been painted and hung.
Photographed by: Dave
Photograph taken on: 8/5/2003
|
|
MVC-349F
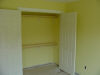
The closet doors are hanging in the front bedroom.
Photographed by: Dave
Photograph taken on: 8/5/2003
|

|
MVC-351F
The stained doors and trim for the study has been added.
Photographed by: Dave
Photograph taken on: 8/5/2003
|
|
MVC-352F
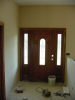
The mahogany wood of our front door took stain well. We still need locks and hardware.
Photographed by: Dave
Photograph taken on: 8/5/2003
|
|
MVC-355F
The dinning area will have a two tone paint theme divided by a chair rail.
Photographed by: Dave
Photograph taken on: 8/5/2003
|

|
MVC-356F
The rear doors have been stained also.
Photographed by: Dave
Photograph taken on: 8/5/2003
|
|
MVC-359F
The inside column has been painted.
Photographed by: Dave
Photograph taken on: 8/5/2003
|
|
MVC-360F
The trench for the electrical line is being dug and pipe is ready to put in with a rope inside for the power company to pull their wires.
Photographed by: Dave
Photograph taken on: 8/6/2003
|
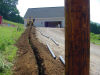
|
MVC-361F
This is showing the trench for future reference.
Photographed by: Dave
Photograph taken on: 8/6/2003
|
|
MVC-362F
Johnny is digging the trench right to the electrical box.
Photographed by: Dave
Photograph taken on: 8/6/2003
|

|
MVC-363F
Everyone should have one of those tools, it makes it so easy, Johnny doesn't even have to ride on it.
Photographed by: Dave
Photograph taken on: 8/6/2003
|

|
MVC-364F
The mortar for the tile work, I needed another bag, so I sent this picture to Linda for her to see what to buy.
Photographed by: Dave
Photograph taken on: 8/7/2003
|
|
MVC-366F
I've been digging trenches to bury the black pipe that will take the water from the guttering away from the house.
Photographed by: Dave
Photograph taken on: 8/7/2003
|

|
MVC-367F
I put 300 feet of black pipe into the ground to take the water most of the way down the hill.
Photographed by: Dave
Photograph taken on: 8/7/2003
|
|
MVC-369F
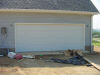
The garage door has been installed.
Photographed by: Dave
Photograph taken on: 8/8/2003
|

|
MVC-370F
They put in a garage door and opener from the Over Head Garage Door company.
Photographed by: Dave
Photograph taken on: 8/8/2003
|
|
MVC-373F
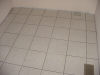
Brent and I tiled the utility room.
Photographed by: Dave
Photograph taken on: 8/12/2003
|
|
MVC-376F
Two half doors leading to our bath room have been hung.
Photographed by: Dave
Photograph taken on: 8/12/2003
|
|
MVC-379F
I laid the tile in the small bathroom.
Photographed by: Dave
Photograph taken on: 8/13/2003
|

|
MVC-384F
The shutters around the windows makes the house look like it is almost done on the outside.
Photographed by: Dave
Photograph taken on: 8/14/2003
|
|
MVC-385F
Guy added shutters around our bathroom windows so it would match the front side windows.
Photographed by: Dave
Photograph taken on: 8/14/2003
|
|
MVC-386F
The handrail for the steps has been installed .
Photographed by: Dave
Photograph taken on: 8/14/2003
|
|
MVC-387F
The electrical fixtures and ceiling fans are going up.
Photographed by: Dave
Photograph taken on: 8/14/2003
|
|
MVC-388F
Ceiling fans in all the bedrooms have been installed.
Photographed by: Dave
Photograph taken on: 8/14/2003
|
|
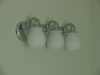
MVC-389F
Our lights in the master bathroom are in place.
Photographed by: Dave
Photograph taken on: 8/14/2003
|
|
MVC-390F
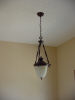
Two sconce lights are working in the dinning area and the chair rail has been added.
Photographed by: Dave
Photograph taken on: 8/14/2003
|

|
MVC-391F
The outside lights at our front door are working.
Photographed by: Dave
Photograph taken on: 8/14/2003
|

|
MVC-392F
The master bath tile floor is going down.
Photographed by: Dave
Photograph taken on: 8/19/2003
|
|
MVC-394F
These guys are cutting tile for the tub surround.
Photographed by: Dave
Photograph taken on: 8/19/2003
|
|
MVC-396F
The results of their work looks good to me.
Photographed by: Dave
Photograph taken on: 8/19/2003
|
|
MVC-398F
They are digging a curtain drain above where our laterals will be placed.
Photographed by: Dave
Photograph taken on: 8/21/2003
|
|
MVC-399F
The HVAC crew is setting the Bryant heat pump outside unit and wiring it.
Photographed by: Dave
Photograph taken on: 8/21/2003
|
|
MVC-405F
They dug a 200 foot curtain drain to keep water from running down the hillside and filling our laterals.
Photographed by: Dave
Photograph taken on: 8/21/2003
|

|
MVC-408F
Roll roofing is placed under the hardwood floor as it is being nailed down.
Photographed by: Dave
Photograph taken on: 8/21/2003
|

|
MVC-409F
Two installers working on the floor in different areas makes the work go faster.
Photographed by: Dave
Photograph taken on: 8/21/2003
|

|
MVC-404F
Our floor finish is called Gunstock. It is pre-finished 3/4" oak hardwood.
Photographed by: Dave
Photograph taken on: 8/21/2003
|
|
MVC-410F
The flooring went smoothly and quickly too, a day and a half for the hardwood in the house.
Photographed by: Dave
Photograph taken on: 8/21/2003
|
|
MVC-414F
Gravel for our laterals has been dumped.
Photographed by: Dave
Photograph taken on: 8/21/2003
|

|
MVC-415F
The dirt is still damp from covering the hole for our septic tank.
Photographed by: Dave
Photograph taken on: 8/28/2003
|
|
MVC-416F
I'll use this picture to find the septic tank if I ever need to dig it up.
Photographed by: Dave
Photograph taken on: 8/28/2003
|
|
MVC-417F
This shows the three boxes for the laterals to branch off the main line.
Photographed by: Dave
Photograph taken on: 8/28/2003
|

|
MVC-418F
350 feet of laterals set level is not an easy job in KY.
Photographed by: Dave
Photograph taken on: 8/28/2003
|
|
MVC-420F
I hope this will remind me where the laterals are located if I ever need to know.
Photographed by: Dave
Photograph taken on: 8/28/2003
|
|
MVC-421F
We finally picked out a light for the study and I installed it.
Photographed by: Dave
Photograph taken on: 8/28/2003
|
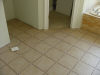
|
MVC-422F
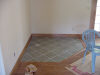
I finished the tile work for under the wood stove.
Photographed by: Dave
Photograph taken on: 8/28/2003
|
|
MVC-423F
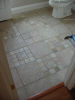
I finished the tile work in the half bath.
Photographed by: Dave
Photograph taken on: 8/28/2003
|
|
MVC-426F
The lights are on, but nobody's home...yet!
Photographed by: Dave
Photograph taken on: 8/28/2003
|

|
MVC-427F
I'm trying to run our first light bill up.
Photographed by: Dave
Photograph taken on: 8/28/2003
|
|
MVC-428F
The whirlpool works. Ask me about it sometime.
Photographed by: Dave
Photograph taken on: 8/28/2003
|

|
MVC-430F
The kitchen cabinets are going in a little at a time.
Photographed by: Dave
Photograph taken on: 8/28/2003
|
|
MVC-431F
The sink cabinets are installed.
Photographed by: Dave
Photograph taken on: 8/28/2003
|

|
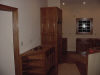
MVC-432F
The vanity in the little bathroom with a solid surface counter has been set.
Photographed by: Dave
Photograph taken on: 8/28/2003
|
|
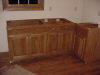
MVC-434F
We made a change on these cabinets. We added glass doors that haven't been put on.
Photographed by: Dave
Photograph taken on: 8/28/2003
|
|
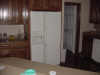
MVC-436F
Our new appliances have arrived and been installed.
Photographed by: Dave
Photograph taken on: 9/19/2003
|
|
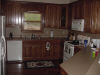
MVC-438F
Looking towards the sink and stove with the counter tops installed too. We have made coffee and some canned soup!
Photographed by: Dave
Photograph taken on: 9/19/2003
|

|
MVC-439F
I really like the wood panel they placed under our breakfast bar.
Photographed by: Dave
Photograph taken on: 9/19/2003
|

|
MVC-441F
I have installed the stove and Chi Chi is enjoying his first fire in it.
Photographed by: Dave
Photograph taken on: 9/19/2003
|

|
MVC-449F
The carpet has been installed as the last item to be finished.
Photographed by: Dave
Photograph taken on: 9/23/2003
|
|
MVC-446F
Linda has started decorating and the contractors are done with their work.
Photographed by: Dave
Photograph taken on: 9/23/2003
|